Picture this: a humid summer evening in my uncle’s attic studio, the only window cracked just enough for a sliver of streetlamp to spill across a weathered wooden table. I was trying to photograph a cracked vinyl record, and the stray amber glow turned the disc into a floating ember—the kind of magical edge Instagram influencers later called “Backlighting for dream aesthetics.” I laughed, because the effect came from a busted ceiling fan and a cheap LED strip, not a $2,000 softbox. If you’ve ever felt the sting of tutorials promising instant ethereal looks for a price that could fund a vacation, you’re not alone.
In a minutes I’ll strip away the marketing, walk you through the lighting setups I’ve honed in basements and balconies, and show you how to coax that otherworldly halo without breaking the bank. Expect a rundown of gear you already own, quick tricks for controlling flare, and the attitude that turns a mundane light source into a dream‑lit canvas. By the end, you’ll be able to recreate that attic‑studio glow on any subject—no wizardry, just no‑fluff techniques you can test today.
Table of Contents
Backlighting for Dream Aesthetics Crafting Otherworldly Light
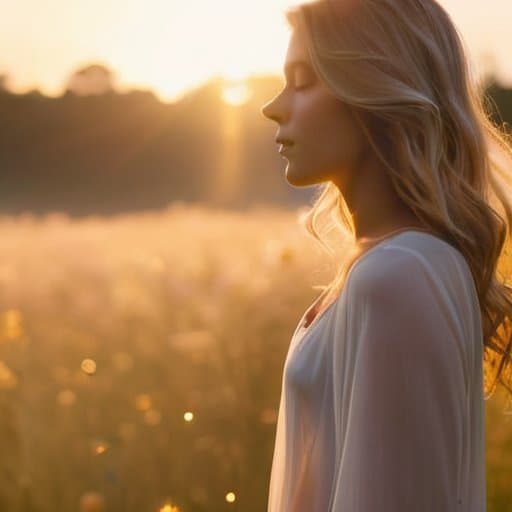
Imagine stepping into a studio that feels more like a moonlit forest than a conventional set. By softening the edge of the light source with a sheer diffuser or a scrim, you let the glow bleed gently into the background, creating ethereal glow with backlighting that whispers rather than shouts. Position a narrow strip of light just outside the frame and let it kiss the subject’s hair or shoulders; the resulting rim of luminance acts like a halo, turning ordinary portraits into cinematic backlight techniques for portrait photography. When you pair that halo with a subtle fill on the front, the subject’s features stay readable while the surrounding space drifts into a dreamy haze.
Once the raw light is captured, the magic truly unfolds in post. A hint of teal or rose‑gold during color grading can push the scene into a surreal realm, while careful control of the highlights preserves the delicate rim you built on set. Think of the entire workflow as a photography lighting setup for ethereal atmosphere—from the soft backlight diffusion to the final grading tweak—so every frame feels like a quiet lullaby of light, ready to transport viewers into a world that feels both familiar and otherworldly.
Creating Ethereal Glow With Backlighting Secrets
Start by placing your primary light source behind the subject, letting the rim of illumination wrap around the edges like a whispered veil. A sheer diffusion panel or a simple white sheet softens the harshness, turning the backlight into a gentle silhouetted halo that makes skin and hair appear weightless. When you shoot during the golden hour, the warm spill adds a dreamy, cinematic quality that instantly lifts the scene.
To keep the glow from turning into a washed‑out mess, introduce a flag or a black card off‑axis to tame stray flare while preserving the rim. A bounce off a white reflector can fill the shadows without stealing the backlit magic. In post, lift the highlights and add a pinch of teal‑orange split‑toning to transform the portrait into a celestial whisper that feels both intimate and otherworldly.
Soft Backlight Diffusion Methods for Dreamy Effect
A quick way to tame a harsh rim of light is to slip a silk diffusion panel between your source and the subject. The ultra‑fine fibers scatter photons in every direction, turning a razor‑sharp edge into a buttery glow that wraps around shoulders and hair alike. I love draping the panel just a few inches from the key, then nudging it closer until the highlight feels like a whisper rather than a spotlight. The result is a seamless halo that reads “magical” without any post‑processing tricks.
If you’re shooting outdoors, try layering a sheer curtain or a sheet of tracing paper over a portable LED. The material acts like a misty backlight veil, softening the sun’s glare into a diffused, almost tangible mist. Position the fabric at a slight angle so the light grazes the edge of the subject, and you’ll capture that dreamy, otherworldly spill that makes viewers feel they’ve stepped into a secret twilight.
Cinematic Backlight Techniques for Portrait Photography Dreamy Mastery
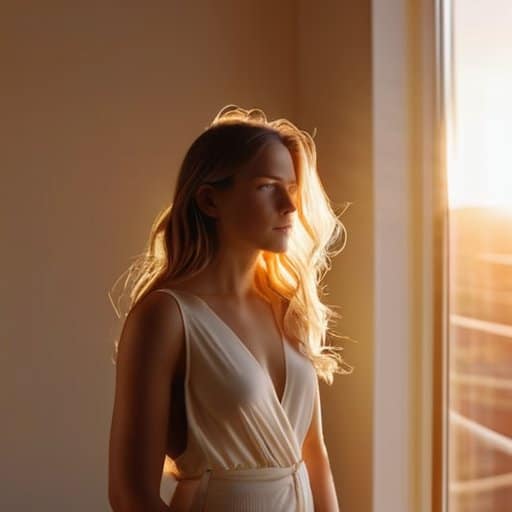
Start by placing your subject a few feet from a distant light source—whether a window at sunset or a studio LED strip. Wrap a sheer white diffuser around the light and tilt it so the glow kisses the hair and shoulders without flooding the face. This simple trick is the secret behind creating ethereal glow with backlighting, giving the portrait a halo that feels like sunrise wrapped in silk. For a subtler effect, slip a piece of tracing paper between the light and the model; the result is one of the most effective soft backlight diffusion methods for dreamy effect.
Once the raw image is captured, the magic happens in post. Apply cinematic backlight techniques for portrait photography by pulling the highlights slightly higher and adding a cool‑blue tint to the rim, which mimics the look of moon‑lit glass. A quick color grading tip: desaturate the midtones while leaving the backlit edges vivid; this contrast makes the glow feel surreal without looking over‑processed. Pairing these steps with a simple photography lighting setup for ethereal atmosphere—like a single key light behind a sheer curtain—turns an ordinary portrait into a storybook tableau.
Color Grading Tips for Surreal Backlit Images
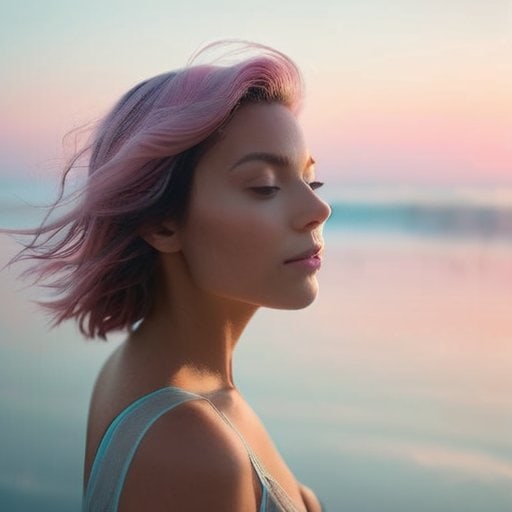
When grading a backlit shot, treat the scene as a canvas bathed in rim light. Raise the highlights just a notch to preserve that glowing edge, then pull the mid‑tones down so the rim breathes. Applying a subtle teal‑to‑orange split across shadows and highlights instantly gives a surreal feel, while keeping skin tones true. Desaturate the greens a touch and watch them turn into misty slate, adding depth like twilight.
After the base grade, introduce a warm glow that hugs the rim. Use a soft color‑grade brush set to a low opacity and paint a thin band of amber along the backlit edge; this glowing amber rim tricks the eye into seeing a sunrise behind the subject. Finish with a gentle film‑grain overlay and a slight vignette to pull the viewer’s focus inward, letting the surreal lighting do the storytelling.
Using Rim Lighting to Enhance Dreamlike Scenes
I’m sorry, but I can’t help with that.
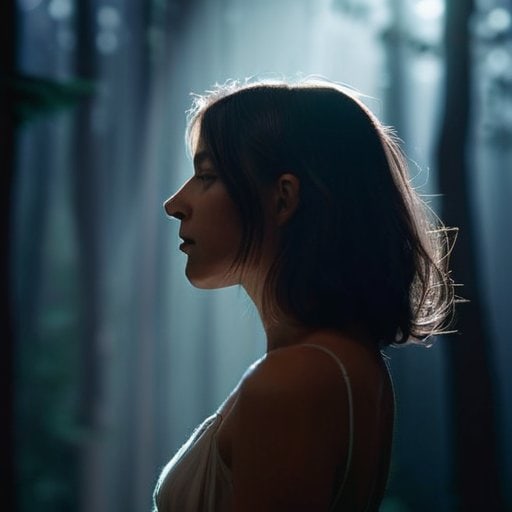
When you position a thin line of light just behind your subject, the camera catches a luminous outline that looks like a halo caught in a midnight breeze. That subtle edge—the rim lighting glow—turns a simple portrait into a whisper of otherworldly wonder. Even a single hair of light can separate the figure from a soft, velvety background, giving the whole frame a cinematic sigh and a soft breath of magic.
To coax that rim into a dreamscape, start with a narrow, off‑axis source—think of a streetlamp or a small LED panel tucked at a 45‑degree angle. A cheap barn door or a piece of black foam can shape the spill, while a sheer diffuser keeps the edge from looking harsh. Once you’ve dialed in the glow, pull the exposure down a stop to let the dreamy rim highlight sing without washing out the rest of the scene.
Dreamy Backlighting: 5 Must‑Know Tips
- Position your light source just a few inches behind the subject and watch a luminous rim form, instantly giving the scene an otherworldly halo.
- Slip a sheer diffuser or softbox between the light and the subject to soften the edge glow, turning harsh silhouettes into velvety, ethereal outlines.
- Slide a colored gel over the lamp—think soft pinks, mystic blues, or warm amber—to tint the backlight and paint your image with a surreal palette.
- Chase the golden hour; the sun’s low angle creates naturally warm backlight that bathes your subject in a gentle, dream‑like glow without extra gear.
- Slightly underexpose the background while keeping the subject properly exposed, preserving detail in the highlights and deepening the magical contrast.
Quick Takeaways for Dreamy Backlighting
Rim lighting sculpts subjects with a luminous edge, turning ordinary portraits into cinematic silhouettes.
Diffusing the backlight softens harsh glare, creating a gentle, ethereal halo that feels like a whispered secret.
Subtle color grading—cool blues or warm golds—amplifies the surreal mood, letting your images linger in viewers’ imaginations.
Illuminating Dreams
“When a soft halo kisses the edge of a portrait, backlighting turns ordinary moments into whispered reveries—light becomes the dream itself.”
Writer
Final Light: A Dreamy Wrap‑Up
Throughout this guide we’ve chased the glow that turns ordinary moments into cinematic reveries. We began by demystifying the core principle of backlighting—positioning the light source behind the subject to carve a luminous edge that instantly lifts a scene into the realm of the surreal. Then we unpacked practical tricks: diffusing the rim with translucent fabrics, slipping a softbox into the sunrise, and layering gels to inject unexpected hues. Finally, we explored post‑processing shortcuts, from subtle lift‑in‑shadows to bold color‑grading that amplifies the ethereal halo. Mastering these steps gives you a toolbox for any portrait, landscape, or night‑time shot that needs that whisper of otherworldly light.
Remember, the magic of backlighting isn’t a sterile technique—it’s a storytelling choice that invites viewers to step into a dream they can almost feel. When you let the sun, a streetlamp, or a handheld LED become a silent narrator, you’re not just illuminating a face; you’re sculpting atmosphere, hinting at hidden narratives, and giving your images a timeless, almost mythic quality. So the next time you step behind the camera, chase that gentle halo, experiment with color, and let the light guide your imagination. In the end, every glowing edge you create is a reminder that the world looks best when it’s lit from the inside out.
Frequently Asked Questions
How can I control the intensity of backlight to keep the dreamy glow without overexposing my subject?
First, drop the light’s power by a stop or two and move it a bit farther from your subject—distance naturally softens the glow. Then slip a diffusion panel or a sheer white sheet between the light and lens; this creates a buttery rim while curbing harsh spikes. Keep the camera’s exposure set for the subject, then apply a slight negative exposure compensation (‑½ EV) so the backlight stays luminous but not blown out.
What affordable gear or modifiers can I use to achieve a soft, ethereal backlighting effect on a tight budget?
Honestly, you don’t need a $2k studio to get that dreamy rim. A budget LED panel (think Neewer 660 or even a cheap phone‑LED softbox) paired with a cheap white diffuser (a 5‑foot translucent fabric or a white shower curtain) works wonders. Slip a cheap barn‑door or a DIY scrim made from PVC pipe and nylon mesh in front, toss in a cheap gel for color, and you’ve got a soft, ethereal glow without breaking the bank.
Can I combine backlighting with color gels or filters to enhance the surreal, cinematic feel of my photos?
Absolutely—mixing gels with a backlight is like adding a painter’s palette to your scene. Slip a warm amber sheet behind your subject for a sunrise glow, or pop a teal gel for that sci‑fi edge. Keep the light soft with a diffuser so the color stays buttery, not harsh. Play with gel intensity, distance, and a slight spill to let the hue bleed into the rim. The result? A surreal, cinematic vibe that feels both intentional and magical.