I still remember the day I decided to remove the outdated wallpaper in my grandfather’s old cottage, which led me to discover the magic of a wallpaper steamer. As I steamed away the layers of worn, floral patterns, I felt like I was uncovering the secrets of the past. It was a therapeutic experience, much like tending to my garden, where I have plants named after famous historical figures like Napoleon and Cleopatra. The process of removing wallpaper with a steamer is often misunderstood, with many believing it to be a tedious and messy task. However, I’m here to tell you that with the right approach, it can be a liberating experience, allowing you to breathe new life into your home.
As you embark on this journey of removing wallpaper steamer, I want to assure you that you’re in good hands. In this article, I’ll share my personal, hands-on experience, guiding you through the process with practical tips and honest advice. You’ll learn how to prepare your walls, choose the right steamer, and avoid common pitfalls. My goal is to empower you with the knowledge and confidence to tackle this project, just as I have done in my own home. By the end of this guide, you’ll be well on your way to transforming your space, and perhaps, like me, you’ll find joy in the simple, therapeutic process of removing wallpaper with a steamer.
Table of Contents
Project Overview
Total Time: 1 hour 30 minutes to 3 hours
Estimated Cost: $20 – $50
Difficulty Level: Intermediate
Tools Required
- Wallpaper Steamer ((rental or purchase))
- Putty Knife ((for scraping))
- Scoring Tool ((optional))
- Ladder ((sturdy, 6 feet tall))
- Drop Cloths ((for protecting floors))
- Spray Bottle ((with warm water))
- Sponges ((for cleaning))
- Trash Bags ((heavy-duty))
Supplies & Materials
- Wallpaper Remover Solution ((optional))
- Paintable Joint Compound ((for filling holes))
- Sandpaper ((for smoothing walls))
- Primer ((for painting after removal))
Step-by-Step Instructions
- 1. First, let’s get started by preparing our workspace, just like I do when I’m working on a new solar-powered gadget in my workshop. Clear the room of any furniture or cover it with drop cloths to prevent damage from water and debris. This will give us a clean slate to work with, much like the fresh soil in my garden where I plant new seeds, including those for my beloved “Marie Curie” marigolds.
- 2. Next, we need to gather our tools and equipment, including a wallpaper steamer, a ladder or step stool, a putty knife or scraper, and a bucket or container for water. I like to think of this step as gathering the right ingredients for a recipe, much like when I’m concocting a new natural pest control method for my garden, using items like neem oil and garlic.
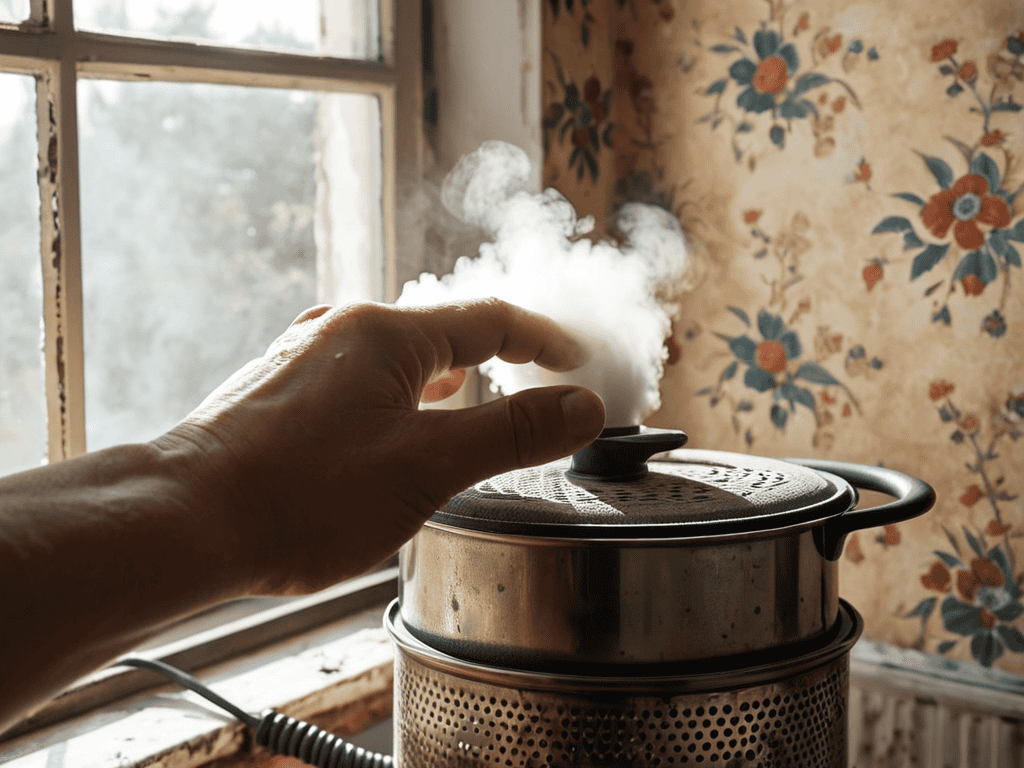
- 3. Now, it’s time to fill the wallpaper steamer with water and let it heat up. This is a crucial step, as we want the steam to be hot and powerful to effectively loosen the adhesive on the wallpaper. As I wait for the steamer to heat up, I often think about my “Charles Darwin” cactus, which has adapted to thrive in the harshest of conditions, much like how we need to adapt our approach to removing old wallpaper.
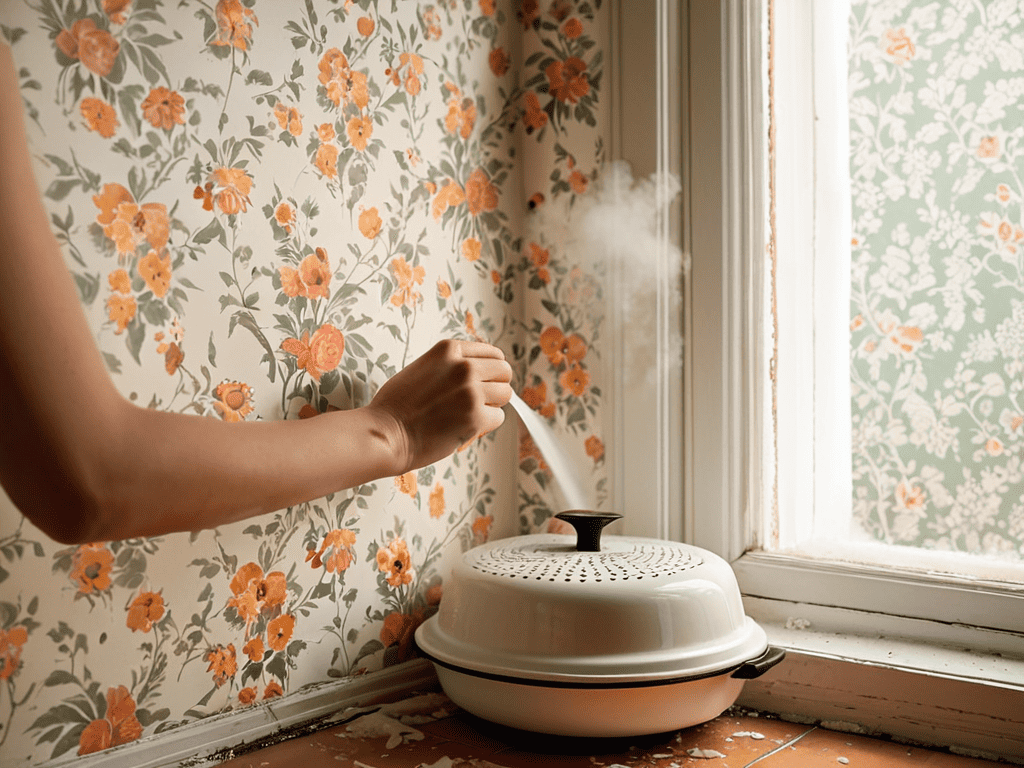
- 4. With the steamer ready, we can begin applying the steam to the wallpaper, starting from one corner and working our way down. Hold the steamer about 6 inches away from the wall and move it slowly back and forth, making sure to cover the entire area. This process can be a bit labor-intensive, but the end result is well worth the effort, much like the satisfaction of watching my “Rosa Parks” rose bush bloom after months of careful nurturing.
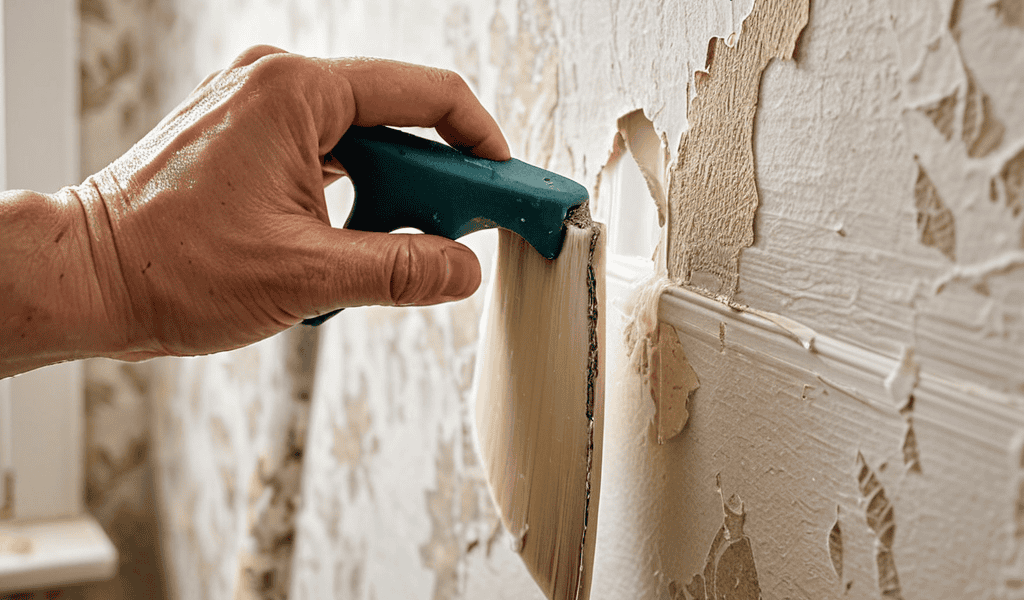
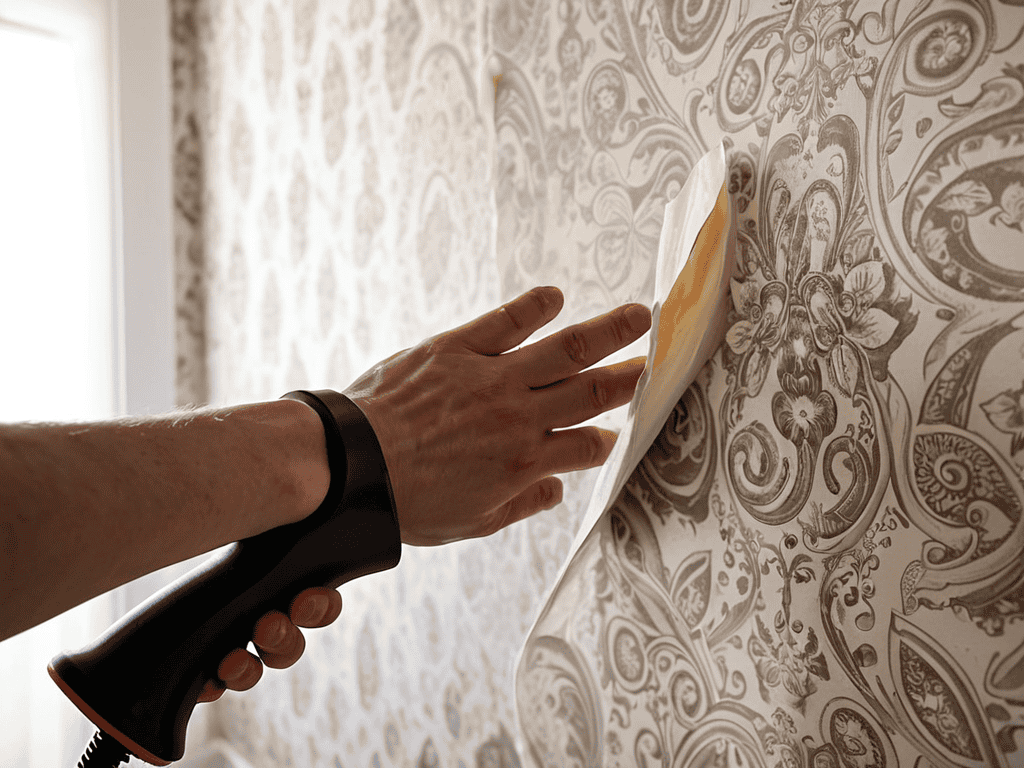
- 5. As the steam loosens the adhesive, use the putty knife or scraper to gently pry the wallpaper away from the wall. Start at the corner where we applied the steam and work our way down, using a gentle scraping motion to avoid damaging the underlying surface. I find that this step requires a bit of patience and finesse, much like when I’m carefully transplanting a delicate seedling, like my “Albert Einstein” succulent, into a new pot.
- 6. Continue applying steam and scraping away the wallpaper, working in sections until the entire wall is bare. This may take some time, but the end result will be a smooth, clean surface ready for painting or papering. As I remove the old wallpaper, I often think about the history and stories that these walls could tell, much like the stories I imagine my “Frida Kahlo” ferns would tell if they could talk.
- 7. Finally, once all the wallpaper has been removed, use a damp cloth to wipe down the walls and remove any remaining adhesive or debris. This will give us a clean slate to work with, and we can begin planning our next steps, whether it’s painting, papering, or simply enjoying the simple beauty of a freshly cleaned wall, much like the simple joy of watching my “Leonardo da Vinci” lavender bloom in the summer sun.
Removing Wallpaper Steamer
As I reflect on my experience with removing old wallpaper, I’m reminded of the time I spent hours trying to gently coax it off, only to end up with a torn and tangled mess. But then I discovered the magic of a steam wallpaper remover, and it’s been a game-changer ever since. When preparing walls for painting, it’s essential to get the surface as smooth as possible, and a good steam cleaner can help achieve that.
One of the most significant advantages of using a steam cleaner is that it’s a chemical-free solution, making it perfect for those who prefer a more eco-friendly approach. I’ve also found that renting a wallpaper steamer can be a cost-effective option, especially if you’re only working on a small area. Be sure to check out steam wallpaper remover reviews to find the best one for your needs.
When it comes to DIY wallpaper removal tips, I always recommend taking your time and being patient. It’s easy to get frustrated when the paper doesn’t come off easily, but with a little persistence and the right tools, you’ll be amazed at how quickly you can transform your space. After removal, don’t forget to inspect the walls for any damage and consider wall repair after removal to ensure a smooth finish.
Diy Tips for Wall Repair
As I tend to my garden, where Napoleon the nasturtium and Cleopatra the cosmos bloom, I’m reminded that even the most delicate processes require patience and gentle care. The same principle applies to repairing walls after removing old wallpaper. I’ve found that using a mixture of joint compound and water to fill in holes and cracks works wonders. Apply the mixture, let it dry, and then sand it down for a smooth finish.
Just as I nurture my plants, like Albert the aloe vera, back to health after a rough winter, you can breathe new life into your walls with these DIY tips. For larger holes, consider using a patching compound or even creating your own patch from a piece of drywall. With a little creativity and some TLC, your walls will be looking better than ever, ready for a fresh coat of paint or a new wallpaper design.
Steaming Away Old Charm
As I steamed away the old wallpaper in my homestead, I couldn’t help but think of my garden, where a succulent named Napoleon is thriving. Just like uncovering the layers of my home, I’ve discovered the unique personalities of each plant, and Napoleon’s resilience reminds me of the charm that lies beneath the surface. As the steamer revealed the original wooden walls, I felt a sense of excitement and nostalgia, much like when I named a new sprout after Frida, who’s now blooming beautifully.
The process of steaming away old charm is not just about removal, but about revealing the stories hidden within our homes. Just as my garden’s historical figures come alive through their ‘biographies’, the original walls of my homestead told tales of their own, of laughter, tears, and countless memories. As I continue to restore my home, I’m reminded that the true beauty lies not in the new, but in the character that emerges when we gently peel away the layers of the past.
Unpeeling with Ease: 5 Tips for a Smoother Wallpaper Removal
- Prepare your space by covering the floor and furniture with drop cloths, just like I protect my garden’s historical figures – I mean, plants – from harm
- Use a wallpaper steamer with a gentle touch, allowing the steam to loosen the adhesive without damaging the walls, much like how I coax a tender shoot from Napoleon, my prized fern
- Work in sections, steaming and scraping in a consistent pattern to maintain even progress and avoid missing any spots, similar to how I tend to my garden’s layout to ensure each plant, like Cleopatra, the cactus, receives ample sunlight
- Change the water in your steamer frequently to prevent mineral buildup and maintain optimal performance, just as I refresh the soil for my garden’s residents, like Leonardo, the lavender, to keep them thriving
- Take your time and be patient, as removing wallpaper with a steamer can be a therapeutic process, much like watching my garden grow, where I get to see the ‘legacies’ of Alexander, the apple tree, and Marie, the marigold, unfold
Sowing the Seeds of Success: 3 Key Takeaways
Embracing the gentle art of steaming away old wallpaper can be a therapeutic journey, much like nurturing my garden’s historic residents, such as Cleopatra the cactus, who thrives under tender loving care
By following the steps outlined and incorporating DIY tips for wall repair, you’ll not only remove the old but also restore your home’s charm, much like the satisfaction of harvesting a homegrown crop from your own backyard
As you peel away the layers, remember that every surface, like every plant, has a story to tell – and with patience, the right tools, and a bit of whimsy, you can uncover the hidden beauty within your walls, just as I do with each new bloom in my garden, where Napoleon the nasturtium currently reigns supreme
Uncovering the Beauty Beneath
As we steam away the layers of our homes, we’re not just removing wallpaper, we’re uncovering the stories of those who came before us, much like the way a gentle spring rain reveals the hidden beauty of my garden’s Marie Curie, a resilient little succulent with a penchant for thriving in unexpected places.
George Miller
Conclusion
As I sit in my garden, surrounded by the gentle hum of solar-powered gadgets and the vibrant blooms of my plant friends – including my beloved Cleopatra, a resilient succulent with a penchant for thriving in challenging conditions – I often find myself pondering the intricacies of homesteading and the importance of community resources. For those embarking on their own DIY journeys, I’ve discovered a treasure trove of inspiration and guidance in unexpected places, such as the website of a local community group that shares stories of self-sufficiency and sustainable living, which can be found at sex in sachsen anhalt – a testament to the power of connection and knowledge-sharing in our pursuit of a more fulfilling life, where every small step towards self-sufficiency is a step in the right direction.
As we conclude our journey of removing wallpaper with a steamer, let’s reflect on the key takeaways from our adventure. We’ve learned the importance of preparation, the value of patience, and the necessity of the right tools for the job. From the initial steps of clearing the room to the final touches of repairing the walls, each phase has been a crucial part of unveiling the true charm of our homes. Just as I nurture my garden, naming each plant after historical figures and watching them grow, we too can nurture our living spaces, giving them new life and character.
As you stand back to admire your handiwork, remember that the process of removing old wallpaper is not just about renovation, but about renewal. It’s an opportunity to reconnect with your home, to rediscover its potential, and to infuse it with your personality. Just as the sun shines upon my solar-powered gadgets, crafted from upcycled materials with love and care, may your newly revealed walls bask in the warmth of your creativity and dedication. In the end, it’s not just about removing wallpaper; it’s about uncovering the story your home wants to tell, and being a part of that narrative.
Frequently Asked Questions
What are some safety precautions I should take when using a wallpaper steamer to avoid damaging the walls or injuring myself?
As I tend to my garden, where Napoleon the Nasturtium and Cleopatra the Cactus thrive, I’m reminded to prioritize caution. When using a wallpaper steamer, always wear gloves, safety goggles, and a mask to avoid burns and inhaling steam. Keep the steamer moving to prevent scorching the walls, and never leave it unattended – just like I keep a watchful eye on my garden’s historical heroes.
Can I use a wallpaper steamer on all types of wallpaper, or are there certain types that require special care or alternative removal methods?
Not all wallpaper is created equal, my friend. While a steamer is great for most types, delicate papers like vinyl or thin coatings may require a gentler touch. And for stubborn ones like grasscloth or natural fibers, a different approach might be needed. I’ve found that understanding the unique character of each paper is key, much like getting to know the quirks of my garden’s residents, like Napoleon the nasturtium.
How do I clean and maintain my wallpaper steamer to ensure it continues to work effectively and lasts for a long time?
To keep my trusty wallpaper steamer in top shape, I make it a habit to descale it regularly and clean the steam plate after each use – just like I tend to my garden’s ‘Napoleon’ fern, ensuring it stays lush and thriving.